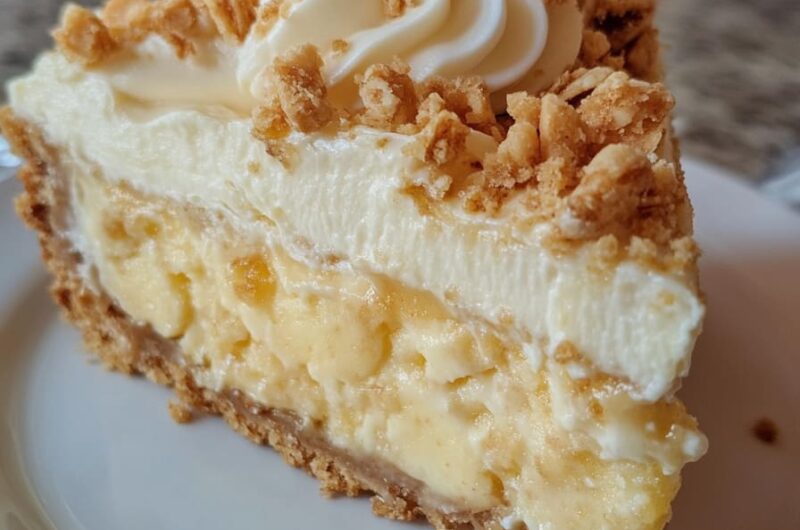
Banana Pudding Crunch Cheesecake is the ultimate dessert for those who have a passion for flavors that collide in the most satisfying way. Combining the creamy richness of cheesecake with the nostalgic flavors of banana pudding creates an enticing treat that is sure to impress. This layered dessert features a crunchy topping, capturing the texture and taste of traditional banana pudding while elevating it to cheesecake perfection.
If you love bananas and creamy textures, this cheesecake will quickly become your favorite dessert. The first bite reveals layers of smooth cheesecake and sweet banana, topped with a crunchy finish that transports you back to childhood. This Banana Pudding Crunch Cheesecake isn’t just a dish; it symbolizes comfort, family gatherings, and celebrations. In this guide, you’ll discover why this recipe stands out, how to make it, and essential serving tips. Let’s delve into the wonderful world of flavors that this dessert brings!
Why You’ll Love This Recipe
Creating a Banana Pudding Crunch Cheesecake offers a multitude of reasons to fall in love with this dessert. Here are several aspects that make it stand out:
1. Unique Flavor Fusion: The combination of banana and cheesecake creates a taste adventure you won’t forget.
2. Mouthwatering Crunch: Topped with crushed cookies, the crunch adds texture that complements the creamy base.
3. Perfect for Any Occasion: Be it birthdays, potlucks, or simple family dinners, this cheesecake fits all celebrations.
4. Easy Preparation: The step-by-step guide ensures that even novice bakers can successfully create this dessert.
5. Visually Stunning: Layers of banana, cream, and crunch make for an eye-catching presentation.
6. Indulgent Yet Satisfying: It delivers on both flavor and texture, making every bite a memorable experience.
Every bit of this cheesecake invites nostalgia while providing a taste that is fresh and exciting. The banana flavor is not overpowering, creating a delicate balance that appeals to everyone.
Preparation and Cooking Time
Making Banana Pudding Crunch Cheesecake is a delightful process, but it does require some time. Here’s an overview of what to expect:
– Preparation Time: Approximately 30 minutes
– Chilling Time: 4 hours (to set)
– Baking Time: 55-60 minutes
In total, you’re looking at around 5 hours and 30 minutes from start to finish. Patience is essential when waiting for your cheesecake to set, but the delicious results are well worth it!
Ingredients
– 2 cups crushed vanilla wafers (plus extra for topping)
– ½ cup unsalted butter, melted
– 3 (8 oz) packages cream cheese, softened
– 1 cup granulated sugar
– 1 teaspoon vanilla extract
– 3 large eggs
– 1 cup ripe bananas, mashed (about 2-3 bananas)
– 1 cup sour cream
– 1 teaspoon lemon juice
– ½ cup heavy whipping cream
– ¼ cup powdered sugar
Step-by-Step Instructions
Creating the Banana Pudding Crunch Cheesecake involves several steps. Following these will lead you to perfect results:
1. Preheat the Oven: Preheat your oven to 325°F (165°C).
2. Prepare the Crust: In a medium bowl, mix crushed vanilla wafers with melted butter until combined. Press the mixture evenly into the bottom of a 9-inch springform pan.
3. Bake the Crust: Bake the crust for 10 minutes, then remove it from the oven and let it cool.
4. Cream the Cheese: In a large bowl, beat the softened cream cheese with an electric mixer on medium speed until smooth.
5. Add Sugar and Vanilla: Gradually add granulated sugar and vanilla extract, mixing until well incorporated.
6. Incorporate Eggs: Add the eggs one at a time, mixing thoroughly after each addition.
7. Fold in Bananas and Sour Cream: Gently fold in the mashed banana, sour cream, and lemon juice until smooth.
8. Pour Filling Over Crust: Pour the banana cheesecake filling onto the cooled crust, spreading it evenly.
9. Bake the Cheesecake: Bake in the preheated oven for 55-60 minutes, or until the center is set and a slight jiggle remains.
10. Cool and Chill: Remove the cheesecake from the oven and allow it to cool before refrigerating it for at least 4 hours to set completely.
11. Whip Heavy Cream: In a separate bowl, whip the heavy cream until soft peaks form. Gradually add powdered sugar, continuing to whip until stiff peaks form.
12. Top with Whipped Cream: Gently spread or pipe the whipped cream over the chilled cheesecake and sprinkle with extra crushed vanilla wafers.
These steps will lead you to a delicious Banana Pudding Crunch Cheesecake that embodies warmth and nostalgia with every slice.
How to Serve
To present your Banana Pudding Crunch Cheesecake beautifully, keep the following tips in mind:
1. Slice Carefully: Use a clean knife for cutting to ensure clean edges. Serve generous slices.
2. Plate Presentation: Place each slice on a plate with a sprinkle of crushed vanilla wafers for an extra touch.
3. Garnish: Consider topping with banana slices or a drizzle of caramel sauce for added flair.
4. Beverage Pairing: This cheesecake pairs wonderfully with a scoop of vanilla ice cream or a cup of coffee.
5. Storing Leftovers: Store any leftovers in an airtight container in the refrigerator for up to 5 days.
By serving the Banana Pudding Crunch Cheesecake thoughtfully, you enhance the experience and make it memorable for everyone enjoying this delightful treat.
Additional Tips
– Choose Ripe Bananas: For the best flavor, select bananas that are fully ripe but not overly brown. This ensures the perfect sweetness and creaminess in your cheesecake.
– Allow Time to Chill: Patience is key! Chilling your cheesecake for at least four hours helps to solidify the layers, enhancing both texture and flavor.
– Serve with Fresh Whipped Cream: While the cheesecake is delicious on its own, a dollop of fresh whipped cream elevates it to a whole new level of indulgence.
– Experiment with Toppings: Besides crushed vanilla wafers, you can add chocolate shavings, sliced almonds, or even a drizzle of caramel for extra flair.
– Use Room Temperature Ingredients: Make sure your cream cheese, eggs, and sour cream are at room temperature to ensure a smooth batter without lumps.
Recipe Variation
Feel free to get creative with your Banana Pudding Crunch Cheesecake! Here are a few variations to try:
1. Chocolate Banana Cheesecake: Incorporate cocoa powder into your cheesecake filling for a rich, chocolatey twist.
2. Nutty Additions: Add chopped walnuts or pecans into the crust or sprinkle them on top for a delightful crunch and flavor contrast.
3. Caramel Swirl: Drizzle caramel sauce into the batter before baking for a sweet, swirled effect.
4. Gluten-Free Option: Replace the crushed vanilla wafers with gluten-free cookies or graham crackers to make this dessert gluten-free without compromising taste.
5. Banana Cream Pie Style: Layer sliced bananas between the cheesecake and whipped cream for a more traditional banana cream pie vibe.
Freezing and Storage
– Storage: Keep your Banana Pudding Crunch Cheesecake covered in the refrigerator to maintain its freshness. It should last up to 5 days.
– Freezing: You can freeze slices of cheesecake for up to 2 months. Wrap the slices tightly in plastic wrap and foil to prevent freezer burn. Thaw in the refrigerator before serving.
Special Equipment
To ensure your Banana Pudding Crunch Cheesecake turns out perfectly, gather the following essential equipment:
– 9-inch Springform Pan: This allows for easy removal of the cheesecake once it is set.
– Electric Mixer: For smooth and well-combined cream cheese filling.
– Mixing Bowls: A couple of medium and large mixing bowls will help with ingredient preparation.
– Spatula: For folding in ingredients and spreading the cheesecake batter evenly.
– Measuring Cups and Spoons: Accurate measurements are crucial for achieving the right flavor and texture.
Frequently Asked Questions
How can I tell when the cheesecake is done baking?
The cheesecake is done when the edges are set but the center has a slight jiggle. It will continue to firm up as it cools.
Can I make this cheesecake in advance?
Absolutely! This cheesecake can be made a day or two before the event. Just remember to cover it well and chill until serving.
Is this banana cheesecake suitable for a gluten-free diet?
Yes, simply use gluten-free vanilla wafers or cookies for the crust to make it gluten-free.
Can I use a different flavor of pudding?
While this recipe highlights banana, you can certainly experiment with other flavors like chocolate or vanilla for a unique twist.
What should I serve with my cheesecake?
This cheesecake pairs well with fresh fruit like strawberries, a scoop of vanilla ice cream, or a cup of coffee for a delightful dessert experience.
Conclusion
The Banana Pudding Crunch Cheesecake is a delightful fusion of childhood flavors and decadent cheesecake. With its layered textures and blend of sweetness, it’s a dessert that evokes nostalgia while tantalizing your taste buds. Whether you’re celebrating a special occasion or simply treating yourself, this cheesecake is sure to please.
Banana Pudding Crunch Cheesecake: An Incredible Ultimate Recipe
- Prep Time: 15 minutes
- Cook Time: 55-60 minutes
- Total Time: 55 minute
Ingredients
– 2 cups crushed vanilla wafers (plus extra for topping)
– ½ cup unsalted butter, melted
– 3 (8 oz) packages cream cheese, softened
– 1 cup granulated sugar
– 1 teaspoon vanilla extract
– 3 large eggs
– 1 cup ripe bananas, mashed (about 2-3 bananas)
– 1 cup sour cream
– 1 teaspoon lemon juice
– ½ cup heavy whipping cream
– ¼ cup powdered sugar
Instructions
Creating the Banana Pudding Crunch Cheesecake involves several steps. Following these will lead you to perfect results:
1. Preheat the Oven: Preheat your oven to 325°F (165°C).
2. Prepare the Crust: In a medium bowl, mix crushed vanilla wafers with melted butter until combined. Press the mixture evenly into the bottom of a 9-inch springform pan.
3. Bake the Crust: Bake the crust for 10 minutes, then remove it from the oven and let it cool.
4. Cream the Cheese: In a large bowl, beat the softened cream cheese with an electric mixer on medium speed until smooth.
5. Add Sugar and Vanilla: Gradually add granulated sugar and vanilla extract, mixing until well incorporated.
6. Incorporate Eggs: Add the eggs one at a time, mixing thoroughly after each addition.
7. Fold in Bananas and Sour Cream: Gently fold in the mashed banana, sour cream, and lemon juice until smooth.
8. Pour Filling Over Crust: Pour the banana cheesecake filling onto the cooled crust, spreading it evenly.
9. Bake the Cheesecake: Bake in the preheated oven for 55-60 minutes, or until the center is set and a slight jiggle remains.
10. Cool and Chill: Remove the cheesecake from the oven and allow it to cool before refrigerating it for at least 4 hours to set completely.
11. Whip Heavy Cream: In a separate bowl, whip the heavy cream until soft peaks form. Gradually add powdered sugar, continuing to whip until stiff peaks form.
12. Top with Whipped Cream: Gently spread or pipe the whipped cream over the chilled cheesecake and sprinkle with extra crushed vanilla wafers.
These steps will lead you to a delicious Banana Pudding Crunch Cheesecake that embodies warmth and nostalgia with every slice.
Nutrition
- Serving Size: 10 slices
- Calories: 350 kcal
- Fat: 22g
- Protein: 5g