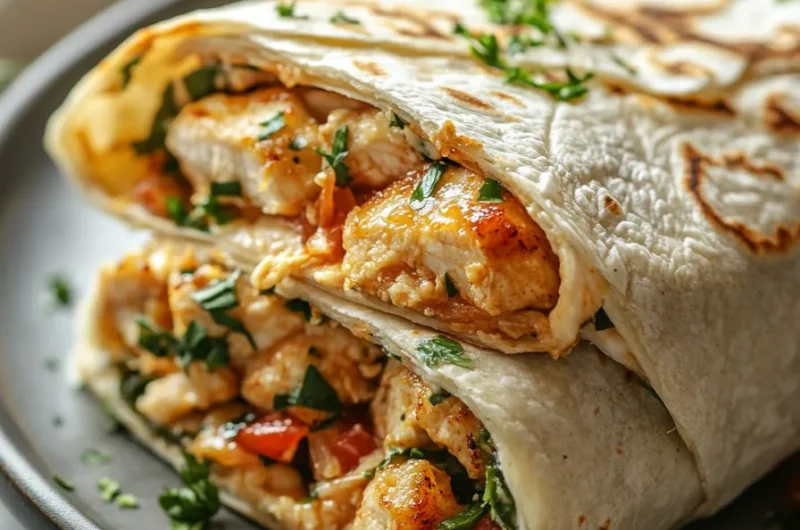
Cheesy Garlic Chicken Wraps are an incredible dish that will leave your taste buds singing. This recipe combines juicy chicken, melted cheese, and a burst of garlic flavor, all wrapped in a warm tortilla. Perfect for lunch, dinner, or as a quick snack, these wraps provide a satisfying and delicious meal option for any time of day. With each bite, the flavors meld together to create an experience you won’t forget. Whether you’re hosting a party or just cooking for yourself, these wraps are an absolute winner.
Imagine biting into a Cheesy Garlic Chicken Wrap: the tender chicken, gooey cheese, and aromatic garlic blend seamlessly. It’s not just a meal; it’s a comfort food that brings a smile to your face. If you adore cheesy goodness or crave a dish that is both simple and satisfying, this recipe is designed for you. In this article, you will discover the wonderful reasons to adore this recipe, the preparation and cooking times, a complete ingredient list, and easy step-by-step instructions to create your mouthwatering wraps.
Why settle for bland meals when you can enjoy Cheesy Garlic Chicken Wraps? The combination of ingredients used elevates this dish, ensuring that every bite is bursting with flavor. Let’s dive into what makes this recipe so special!
Why You’ll Love This Recipe
Cheesy Garlic Chicken Wraps are a crowd-pleaser for various reasons. Here are just a few that highlight why you’ll fall in love with this recipe:
1. Deliciously Flavorful – The mix of garlic and cheese creates a tantalizing taste that delightfully complements the chicken.
2. Quick and Easy – With straightforward instructions, you can whip up these wraps in no time, making them perfect for busy weekdays.
3. Customizable – Feel free to add your favorite vegetables or spices, creating a wrap that suits your personal preference.
4. Kid-Friendly – The cheesy goodness makes it appealing to even the pickiest eaters in your household.
5. Perfect for Meal Prep – These wraps store well in the fridge, making them an excellent option for meal prep enthusiasts.
6. Versatile – Whether you serve them with a side salad or dip them in sauce, these wraps are fantastic for any occasion.
These factors make Cheesy Garlic Chicken Wraps stand out as not just a recipe, but a fantastic dining option that is sure to win over family and friends alike!
Preparation and Cooking Time
Creating Cheesy Garlic Chicken Wraps is a quick process! Here’s how the time breaks down:
– Preparation Time: 15 minutes
– Cooking Time: 20-25 minutes
– Total Time: Approximately 35-40 minutes
These times can vary depending on your cooking experience and kitchen tools, but this guide will help you gauge what to expect as you prepare this amazing meal.
Ingredients
– 2 cups cooked chicken, shredded or diced
– 1 cup shredded cheddar cheese
– 4 large flour tortillas
– ½ cup cream cheese, softened
– 3 cloves garlic, minced
– 1 tablespoon olive oil
– 1 teaspoon paprika
– Salt and pepper, to taste
– 1 cup fresh spinach or lettuce (optional)
– ½ cup diced tomatoes (optional)
– Cooking spray or butter, for toasting
Step-by-Step Instructions
Creating Cheesy Garlic Chicken Wraps is a breeze! Follow these simple steps for a delicious meal:
1. Prepare the Chicken: If not pre-cooked, grill or boil your chicken until fully cooked. Shred or dice it into small pieces.
2. Make the Garlic Mixture: In a bowl, mix the softened cream cheese with minced garlic, paprika, salt, and pepper until well combined.
3. Combine the Ingredients: In a large bowl, combine the chicken and shredded cheddar cheese with the garlic mixture. Stir well to ensure everything is evenly distributed.
4. Assemble the Wraps: Lay out the tortillas and spread a generous portion of the chicken and cheese mixture onto each tortilla. If using, add spinach and diced tomatoes for added flavor and nutrients.
5. Wrap it Up: Carefully roll each tortilla tightly around the filling, tucking in the ends to prevent spillage.
6. Toast the Wraps: Heat a skillet over medium heat and lightly coat it with cooking spray or butter. Place the wraps seam-side down in the skillet and toast for 2-3 minutes on each side until golden brown and crispy.
7. Slice and Serve: Once toasted, remove from the skillet and slice each wrap in half or quarters for easier handling. Serve immediately while hot.
With these straightforward steps, you’ll craft perfect Cheesy Garlic Chicken Wraps every time!
How to Serve
Presenting your Cheesy Garlic Chicken Wraps beautifully can enhance your dining experience. Here are some fantastic serving suggestions:
1. Accompaniments: Consider serving with a side of salsa, guacamole, or sour cream for added flavor.
2. Fresh Garnish: Top with fresh herbs like cilantro or parsley for a pop of color and freshness.
3. Salad Pairing: A simple side salad can make for a well-rounded meal and add a crunchy texture.
4. Cut and Arrange: Slice the wraps into halves or quarters and arrange them on a platter for a visually appealing display.
5. Beverage Pairing: Pair with iced tea, lemonade, or a cold beverage to refresh your palate.
These thoughtful serving ideas will elevate your Cheesy Garlic Chicken Wraps, making them an impressive dish that your guests will love! Enjoy exploring this delightful and cheesy recipe.
Additional Tips
– Use Quality Ingredients: For the best flavor, choose fresh chicken and high-quality cheese. This will significantly enhance the overall taste of your Cheesy Garlic Chicken Wraps.
– Don’t Overstuff: While it can be tempting to add more filling, avoid overstuffing your wraps. This ensures they stay intact when you roll them up and makes them easier to cook.
– Experiment with Spices: Aside from paprika, consider adding crushed red pepper for some heat or Italian seasoning to elevate the flavor profile.
Recipe Variation
Feel free to switch things up! Here are a few variations to try:
1. BBQ Chicken Wraps: Substitute shredded chicken with BBQ-flavored chicken for a smoky twist. Add a drizzle of your favorite BBQ sauce to the mix.
2. Vegetarian Option: Replace chicken with grilled vegetables such as zucchini, bell peppers, and onion. You can also add chickpeas for extra protein.
3. Buffalo Chicken Wraps: Mix shredded chicken with buffalo sauce, then combine with cheese and cream cheese for a spicy kick.
Freezing and Storage
– Storage: Keep the wraps in an airtight container in the refrigerator for up to 3 days. Enjoy them cold or reheat them in the skillet or microwave.
– Freezing: You can freeze un-toasted wraps individually, wrapped tightly in plastic wrap and stored in a freezer-safe bag for up to 2 months. When ready to eat, thaw and toast as directed.
Special Equipment
You will need a few essential tools to prepare the Cheesy Garlic Chicken Wraps successfully:
– Skillet: For toasting the wraps and achieving that perfect golden-brown crust.
– Mixing bowls: For preparing the garlic mixture and chicken filling.
– Spatula: To flip the wraps easily in the skillet.
– Knife: To slice the wraps for serving.
Frequently Asked Questions
Can I use leftover chicken?
Yes! Leftover rotisserie chicken works great in this recipe and saves you time.
What kind of cheese can I use?
While cheddar is delicious, you can also try mozzarella, Monterey Jack, or pepper jack for a different flavor.
Is this recipe gluten-free?
You can easily make it gluten-free by using gluten-free tortillas. Just double-check all other ingredients for gluten content.
Can I make this dish spicy?
Absolutely! Adding jalapeños or hot sauce to the filling can give it a nice kick.
How can I make this dish more filling?
You can add more vegetables such as bell peppers, onions, or even beans for added fiber and nutrients.
Conclusion
Cheesy Garlic Chicken Wraps are a delightful and versatile dish that offers a delicious balance of flavors and textures. Whether enjoyed as a quick meal or at a gathering, these wraps are sure to impress. With their easy preparation and customizable options, this recipe is perfect for any occasion. Savor each bite of this cheesy, garlicky goodness, and make it a staple in your kitchen!
Cheesy Garlic Chicken Wraps: An Amazing Ultimate Recipe
- Prep Time: 15 minutes
- Cook Time: 20-25 minutes
- Total Time: 38 minute
Ingredients
– 2 cups cooked chicken, shredded or diced
– 1 cup shredded cheddar cheese
– 4 large flour tortillas
– ½ cup cream cheese, softened
– 3 cloves garlic, minced
– 1 tablespoon olive oil
– 1 teaspoon paprika
– Salt and pepper, to taste
– 1 cup fresh spinach or lettuce (optional)
– ½ cup diced tomatoes (optional)
– Cooking spray or butter, for toasting
Instructions
Creating Cheesy Garlic Chicken Wraps is a breeze! Follow these simple steps for a delicious meal:
1. Prepare the Chicken: If not pre-cooked, grill or boil your chicken until fully cooked. Shred or dice it into small pieces.
2. Make the Garlic Mixture: In a bowl, mix the softened cream cheese with minced garlic, paprika, salt, and pepper until well combined.
3. Combine the Ingredients: In a large bowl, combine the chicken and shredded cheddar cheese with the garlic mixture. Stir well to ensure everything is evenly distributed.
4. Assemble the Wraps: Lay out the tortillas and spread a generous portion of the chicken and cheese mixture onto each tortilla. If using, add spinach and diced tomatoes for added flavor and nutrients.
5. Wrap it Up: Carefully roll each tortilla tightly around the filling, tucking in the ends to prevent spillage.
6. Toast the Wraps: Heat a skillet over medium heat and lightly coat it with cooking spray or butter. Place the wraps seam-side down in the skillet and toast for 2-3 minutes on each side until golden brown and crispy.
7. Slice and Serve: Once toasted, remove from the skillet and slice each wrap in half or quarters for easier handling. Serve immediately while hot.
With these straightforward steps, you’ll craft perfect Cheesy Garlic Chicken Wraps every time!
Nutrition
- Serving Size: 4 wraps
- Calories: 550 kcal
- Fat: 25g
- Protein: 30g