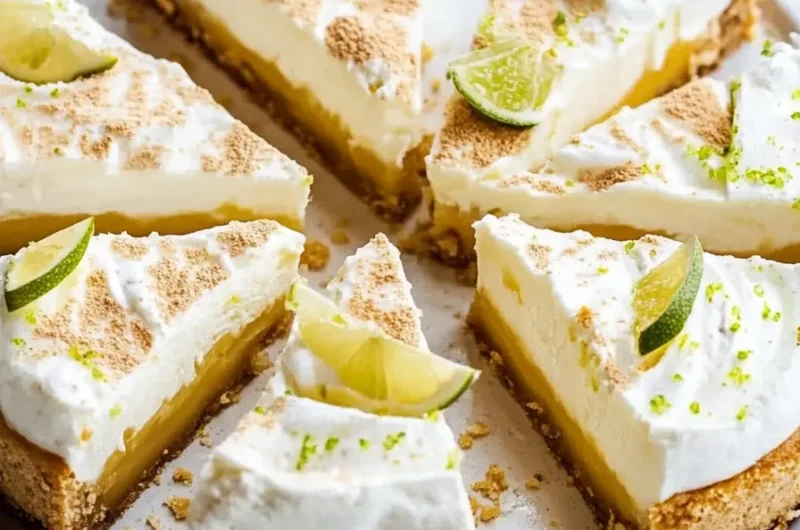
Key Lime Pie Bars are refreshingly delicious treats that showcase the bright, zesty flavor of key lime. With each bite, you are greeted by a perfect balance of tartness and sweetness that dances on your palate. These delightful bars evoke images of warm summer days and breezy beach outings, making them a perfect dessert for any occasion. Whether you’re looking to impress guests at a gathering or simply want a scrumptious dessert to enjoy at home, this recipe stands out for its simplicity and incredible flavor.
The beauty of Key Lime Pie Bars lies in their versatility. They are as pleasing to the eye as they are to the taste buds. With a crunchy graham cracker crust, a creamy, tangy filling, and a light sprinkle of whipped cream on top, they are an irresistible treat that can evoke feelings of nostalgia or transport you to a sunlit shore. This guide will share why you’ll love this recipe, the preparation and cooking time, the essential ingredients, step-by-step instructions, and how to serve these delightful bars to wow your friends and family.
Let’s dive into the world of Key Lime Pie Bars, where each step brings you closer to creating an incredible dessert.
Why You’ll Love This Recipe
Key Lime Pie Bars are more than just a dessert; they’re a celebration of flavor, texture, and simplicity. Here’s why you’ll fall head over heels for this amazing recipe:
1. Easy to Make: The straightforward instructions enable anyone, regardless of skill level, to create impressive bars.
2. Refreshing Flavor: The vibrant taste of key lime adds a refreshing element that brightens up any meal or occasion.
3. Perfect for Sharing: With this recipe yielding 12 generous bars, it’s perfect for parties, potlucks, or family gatherings.
4. Versatile Presentation: The bars can be dressed up with toppings or served simply, making them suitable for both casual and formal occasions.
5. Make-Ahead Option: You can prepare them in advance, allowing flavors to meld while you enjoy your day.
6. Popular Appeal: Many people adore the classic flavor of key lime pie, ensuring these bars will be a hit among friends and family.
By understanding the reasons behind their popularity, you’ll appreciate why Key Lime Pie Bars can be a fantastic addition to your dessert repertoire.
Preparation and Cooking Time
Creating these delightful Key Lime Pie Bars doesn’t take much time at all. Here’s a breakdown of the total time required:
– Preparation Time: 15 minutes
– Baking Time: 25 minutes
– Cooling Time: 2 hours
– Total Time: Approximately 2 hours and 40 minutes (mostly cooling time)
This timeframe makes it feasible to have your bars ready for any occasion without spending all day in the kitchen.
Ingredients
– For the crust:
– 1 ½ cups graham cracker crumbs
– ½ cup granulated sugar
– ½ cup unsalted butter, melted
– For the filling:
– 2 large eggs
– 1 cup sweetened condensed milk
– ½ cup key lime juice (freshly squeezed or bottled)
– Zest of 2 key limes
– ¼ teaspoon salt
– For the topping (optional):
– Whipped cream
– Lime slices or zest for garnish
Step-by-Step Instructions
Follow these simple steps to create amazing Key Lime Pie Bars:
1. Preheat the Oven: Set your oven to 350°F (175°C).
2. Prepare the Baking Dish: Grease an 8×8 inch (or similar size) baking dish or line it with parchment paper for easy removal.
3. Make the Crust: In a mixing bowl, combine graham cracker crumbs, granulated sugar, and melted butter. Stir until well mixed.
4. Press the Crust: Firmly press the mixture into the bottom of the prepared baking dish to create an even layer. Bake for 10 minutes.
5. Prepare the Filling: In another bowl, whisk together the eggs, sweetened condensed milk, key lime juice, lime zest, and salt until smooth.
6. Pour Filling into Crust: Once the crust is baked, remove it from the oven and pour the filling over the crust evenly.
7. Bake Again: Return the dish to the oven and bake for an additional 15-20 minutes, or until the filling is set but slightly jiggly in the center.
8. Cool Down: Allow the bars to cool at room temperature for about 30 minutes. Then, refrigerate for at least 2 hours to chill completely.
9. Slice into Bars: Use a sharp knife to carefully slice into squares, wiping the knife between cuts for clean edges.
10. Add Toppings: If desired, top with whipped cream and garnish with lime slices or additional zest.
These straightforward steps will lead you to create a batch of Key Lime Pie Bars that are not only delectable but also visually appealing.
How to Serve
To create a memorable experience when serving your Key Lime Pie Bars, consider the following tips:
1. Presentation: Arrange the bars on a beautiful serving platter. This simple step elevates the overall appearance.
2. Accompaniments: Pair with fresh berries or a scoop of vanilla ice cream for added texture and flavor.
3. Portion Control: Cut the bars into smaller pieces to encourage guests to try more than one.
4. Serve Chilled: Always serve the bars chilled to enhance their refreshing qualities.
5. Beverage Pairing: Pair with iced tea, lemonade, or a light white wine for a delightful pairing.
With these serving suggestions, you’ll create an engaging and enjoyable experience for your guests, ensuring they savor each bite of your delicious Key Lime Pie Bars!
Additional Tips
– Use Fresh Key Limes: For the best flavor, use freshly squeezed lime juice. The taste will be vibrant and refreshing, enhancing your Key Lime Pie Bars.
– Chill Before Serving: Allow the bars to chill completely in the refrigerator before serving. This helps the flavors set and results in cleaner slices.
– Garnish Creatively: Consider adding toppings like toasted coconut or lime zest to elevate the presentation and add texture.
– Use a Sharp Knife: To achieve perfect slices, use a sharp knife and clean it between cuts. This will help maintain the bars’ neat edges.
– Experiment with Sweetness: Adjust the amount of sweetness by modifying the sugar in the filling if you prefer a more tart version.
Recipe Variation
There’s always room for creativity in the kitchen! Here are a few variations of Key Lime Pie Bars to tempt your taste buds:
1. Coconut Key Lime Bars: Add shredded coconut to the crust for a tropical twist. This will provide a lovely chewiness along with the crunch.
2. Chocolate Drizzle: Drizzle melted chocolate over the cooled bars for an indulgent touch that complements the tangy flavor of the key lime.
3. Meringue Topping: Top your bars with a light meringue layer instead of whipped cream. This adds an elegant finish and a different flavor profile.
4. Berry Layer: Incorporate a layer of fresh berries, like blueberries or raspberries, under the filling for a fruity layer that pairs wonderfully with the tartness of key lime.
5. Ginger Snap Crust: Swap the graham cracker crust for a ginger snap crust for a spicy kick that plays well with the lime’s zestiness.
Freezing and Storage
Proper storage ensures your Key Lime Pie Bars remain delicious for longer:
– Storage: Keep the bars in an airtight container in the refrigerator. They will stay fresh for up to 5 days.
– Freezing: For long-term storage, you can freeze the bars. Wrap them tightly in plastic wrap, then place them in an airtight container. They can be frozen for up to 3 months. Thaw in the refrigerator before serving.
Special Equipment
Having the right tools can help you prepare Key Lime Pie Bars much easier:
– Mixing Bowls: Use sturdy bowls for mixing your crust and filling.
– Whisk: A good whisk makes it easier to blend your filling until smooth.
– Baking Dish: An 8×8 inch baking dish is ideal for this recipe.
– Parchment Paper: Lining your baking dish with parchment paper makes it easier to lift out the bars after cooling.
– Sharp Knife: A sharp knife is essential for cutting the bars neatly.
Frequently Asked Questions
Can I substitute regular lime juice for key lime juice?
Yes, you can use regular lime juice if key limes are unavailable. The flavor will be slightly different but still delicious.
How do I get my bars to set properly?
Make sure to let them cool completely at room temperature before refrigerating. This allows the filling to set properly.
Can I add more lime zest to enhance the lime flavor?
Absolutely! Adding more zest will amplify the lime flavor, making for a zippier bite.
What can I do if I don’t have sweetened condensed milk?
You can make your own by simmering milk and sugar together until it thickens. However, sweetened condensed milk is recommended for this recipe.
Is this dessert gluten-free?
To make gluten-free Key Lime Pie Bars, use gluten-free graham cracker crumbs or substitute with almond flour mixed with sugar and butter.
Conclusion
Key Lime Pie Bars are a delightful blend of zesty and creamy flavors that can brighten any meal. Their simplicity and versatility make them a favorite dessert choice for many. Whether serving them at a gathering or simply indulging at home, these bars are sure to impress. With the tips, variations, and serving suggestions provided, you now have all the tools needed to create the perfect Key Lime Pie Bars while putting your unique spin on the classic recipe.
Key Lime Pie Bars: The Amazing Ultimate Recipe for 12
- Prep Time: 15 minutes
- Cook Time: 25 minutes
- Total Time: 40 minutes
Ingredients
– For the crust:
– 1 ½ cups graham cracker crumbs
– ½ cup granulated sugar
– ½ cup unsalted butter, melted
– For the filling:
– 2 large eggs
– 1 cup sweetened condensed milk
– ½ cup key lime juice (freshly squeezed or bottled)
– Zest of 2 key limes
– ¼ teaspoon salt
– For the topping (optional):
– Whipped cream
– Lime slices or zest for garnish
Instructions
Follow these simple steps to create amazing Key Lime Pie Bars:
1. Preheat the Oven: Set your oven to 350°F (175°C).
2. Prepare the Baking Dish: Grease an 8×8 inch (or similar size) baking dish or line it with parchment paper for easy removal.
3. Make the Crust: In a mixing bowl, combine graham cracker crumbs, granulated sugar, and melted butter. Stir until well mixed.
4. Press the Crust: Firmly press the mixture into the bottom of the prepared baking dish to create an even layer. Bake for 10 minutes.
5. Prepare the Filling: In another bowl, whisk together the eggs, sweetened condensed milk, key lime juice, lime zest, and salt until smooth.
6. Pour Filling into Crust: Once the crust is baked, remove it from the oven and pour the filling over the crust evenly.
7. Bake Again: Return the dish to the oven and bake for an additional 15-20 minutes, or until the filling is set but slightly jiggly in the center.
8. Cool Down: Allow the bars to cool at room temperature for about 30 minutes. Then, refrigerate for at least 2 hours to chill completely.
9. Slice into Bars: Use a sharp knife to carefully slice into squares, wiping the knife between cuts for clean edges.
10. Add Toppings: If desired, top with whipped cream and garnish with lime slices or additional zest.
These straightforward steps will lead you to create a batch of Key Lime Pie Bars that are not only delectable but also visually appealing.
Nutrition
- Serving Size: 12 bars
- Calories: 210 kcal
- Fat: 9g
- Protein: 3g