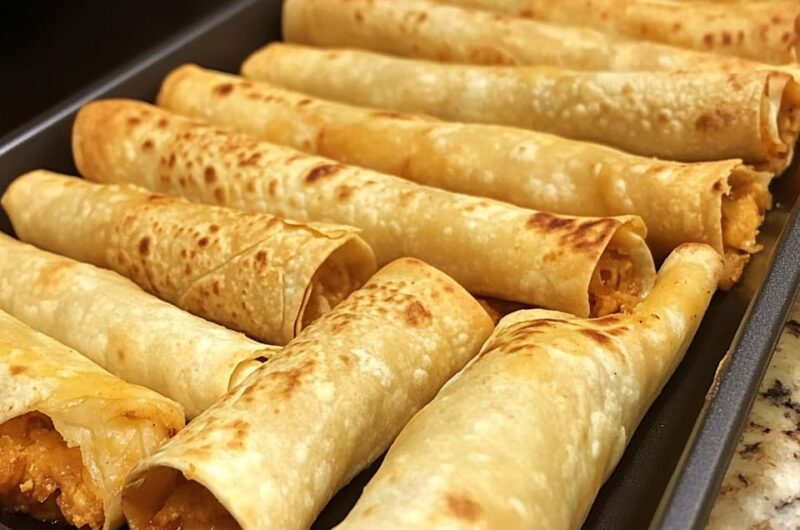
Taquitos are a delightful Mexican snack that packs an incredible punch of flavor. These little rolled tortillas, filled with various ingredients, are always a crowd-pleaser. Whether you make them for a family dinner or a party snack, taquitos are sure to impress. The wonderful combination of seasonings and textures makes every bite a joy. In this guide, you’ll learn all about taquitos, from why you’ll love making them to the perfect way to serve them.
Imagine biting into a crispy taquito, its warm interior filled with your choice of savory ingredients, all perfectly seasoned. Taquitos are not only delicious, but they’re also versatile, allowing you to customize the fillings to your taste. Moreover, they can easily be made ahead of time and frozen, making them a convenient option for busy days. Let’s dive into why this recipe is so special and how to create your very own, delicious taquitos that will surely become a household favorite.
If you’ve never made taquitos before, fear not! This recipe is designed to be easy to follow, ensuring a successful cooking experience. Whether you’re a novice in the kitchen or have some culinary experience under your belt, this amazing and tasty dish is perfect for your next gathering.
Why You’ll Love This Recipe
There are countless reasons to love making your own taquitos at home. Here are just a few:
1. Customizable Fillings: Use any protein or vegetable you enjoy, from chicken and beef to beans and cheese. The options are nearly limitless!
2. Crispy Texture: A well-made taquito has that perfect crunch, giving you an irresistible bite.
3. Perfect for Any Occasion: Whether it’s game day, a casual family dinner, or a festive gathering, taquitos are always a hit.
4. Easy to Prepare: The recipe is straightforward, and you don’t need any advanced cooking skills to succeed.
5. Freezer-Friendly: Make a large batch in advance, freeze them, and simply bake or fry them when ready to eat.
6. Delicious Dipping Sauces: Pair your taquitos with a variety of sauces like guacamole, salsa, or sour cream to enhance the experience.
With these wonderful qualities, it’s easy to see why taquitos are commonly loved by many!
Preparation and Cooking Time
Creating these delightful taquitos doesn’t take much time at all. Here’s a quick estimate of the overall time you’ll need:
– Preparation Time: 20 minutes
– Cooking Time: 15 minutes
– Total Time: 35 minutes
This timeframe is perfect for whipping up a quick snack or meal, making it ideal for busy days.
Ingredients
– 12 small corn or flour tortillas
– 2 cups shredded cooked chicken (or any protein of your choice)
– 1 cup shredded cheese (cheddar, Monterey Jack, or Mexican blend)
– 1 tablespoon taco seasoning
– 1/2 cup diced onion (optional)
– Cooking oil (for frying)
– Fresh cilantro (for garnish, optional)
– Salsa or guacamole (for serving)
Step-by-Step Instructions
Making taquitos is a simple process. Just follow these steps to create your own batch:
1. Prepare Filling: In a bowl, combine the shredded chicken, cheese, taco seasoning, and diced onion. Mix until everything is well combined.
2. Soften Tortillas: Heat the tortillas in a dry skillet for about 30 seconds on each side, or place them in a microwave to warm them up. This makes them more pliable.
3. Fill Tortillas: Place about 2 tablespoons of the filling mixture onto the lower third of each tortilla.
4. Roll Tightly: Carefully roll the tortilla away from you, keeping the filling inside, and tuck in the sides as you go.
5. Secure Filling: For added security, you could use a toothpick to hold each taquito together if needed.
6. Heat Oil: In a large skillet, heat about 1-2 inches of cooking oil over medium heat.
7. Fry Taquitos: Once the oil is hot, carefully place the rolled taquitos seam-side down. Fry for about 3-4 minutes on each side, or until golden brown and crispy.
8. Drain Excess Oil: Once cooked, remove the taquitos from the oil and place them on a paper towel-lined plate to drain any excess oil.
9. Garnish: Sprinkle with fresh cilantro if desired.
10. Serve Warm: Plate the taquitos and serve immediately with your choice of salsa or guacamole.
By following these straightforward steps, you’ll have a batch of amazing taquitos ready to enjoy in no time!
How to Serve
Presenting your taquitos in a delightful way enhances the overall eating experience. Here are a few tips for serving:
1. Plating: Arrange the taquitos on a large platter for a stunning display.
2. Garnishing: Brighten the plate with fresh cilantro or lime wedges for added color and flavor.
3. Accompaniments: Serve with a variety of dipping sauces such as salsa, guacamole, sour cream, or pico de gallo for a fun and interactive meal.
4. Beverage Pairing: Consider serving with refreshing beverages like iced tea, lemonade, or a light beer to complement the flavors of the dish.
By taking these steps when serving taquitos, you’ll ensure an enjoyable and memorable dining experience for you and your guests. Enjoy your delicious creation!
Additional Tips
– Experiment with Spices: Feel free to add spices to your filling for an extra kick. A pinch of cumin or chili powder can elevate the flavor of your taquitos significantly.
– Use Leftovers: Taquitos are a great way to use up leftovers. Any cooked meat or vegetables can be repurposed into a delicious filling.
– Add Fresh Ingredients: Try incorporating fresh ingredients like diced tomatoes, jalapeños, or corn into the filling for added flavor and texture.
Recipe Variation
Get creative with these fun variations:
1. Vegetarian Option: Replace the chicken with black beans, pinto beans, or a mix of sautéed vegetables. This provides a hearty, meatless option.
2. Cheese Lovers’ Taquitos: Use multiple cheese types in your filling, such as cream cheese combined with cheddar and mozzarella for creaminess.
3. Sweet Taquitos: For a dessert twist, fill taquitos with a mixture of cinnamon, sugar, and cream cheese, then drizzle with chocolate sauce after frying.
Freezing and Storage
– Storage: Store your taquitos in an airtight container in the refrigerator for up to three days. Reheat in the oven or a skillet to maintain their crispness.
– Freezing: Freeze uncooked taquitos on a baking sheet until solid, then transfer them to a freezer bag. They can be stored for up to three months. You can cook them directly from frozen; just add a few extra minutes to the cooking time.
Special Equipment
To make the perfect taquitos, you may want the following tools:
– Skillet: A large skillet is essential for frying your taquitos evenly.
– Tongs: For easy flipping and removing the taquitos from hot oil.
– Baking Sheet: If you choose to bake them, a baking sheet lined with parchment makes clean-up simple.
– Rolling Pin (optional): If using flour tortillas, a rolling pin can help smooth them out for easy rolling.
Frequently Asked Questions
Can I use larger tortillas?
Yes, larger tortillas may be used. However, it might require more filling and lengthening the cooking time slightly.
What if my taquitos come apart while frying?
Ensure the tortillas are not too dry. If they break apart, try warming them up a bit more to make them pliable, or use a toothpick to secure them.
Can I bake taquitos instead of frying them?
Absolutely! Brush them lightly with oil and bake in a preheated oven at 400°F (200°C) for about 15-20 minutes, turning halfway through until crispy.
Are there gluten-free options?
You can substitute regular tortillas with gluten-free tortillas to make this recipe suitable for those avoiding gluten.
How can I make the filling spicier?
Incorporate diced jalapeños, hot sauce, or chipotle powder into your filling for a spicy kick.
Conclusion
Making taquitos at home is not only rewarding but also downright delicious. With their crispy exterior and flavorful filling, they are perfect for any occasion. Whether you choose to stick with the classic chicken or branch out with unique fillings, taquitos will undoubtedly be a hit. Enjoy the cooking process, and don’t hesitate to get creative with your ingredients and presentation. Happy cooking!
Taquitos: An Incredible Ultimate Recipe You Must Try

- Prep Time: 15 minutes
- Cook Time: 15 minutes
- Total Time: 30 minutes
Ingredients
– 12 small corn or flour tortillas
– 2 cups shredded cooked chicken (or any protein of your choice)
– 1 cup shredded cheese (cheddar, Monterey Jack, or Mexican blend)
– 1 tablespoon taco seasoning
– 1/2 cup diced onion (optional)
– Cooking oil (for frying)
– Fresh cilantro (for garnish, optional)
– Salsa or guacamole (for serving)
Instructions
Making taquitos is a simple process. Just follow these steps to create your own batch:
1. Prepare Filling: In a bowl, combine the shredded chicken, cheese, taco seasoning, and diced onion. Mix until everything is well combined.
2. Soften Tortillas: Heat the tortillas in a dry skillet for about 30 seconds on each side, or place them in a microwave to warm them up. This makes them more pliable.
3. Fill Tortillas: Place about 2 tablespoons of the filling mixture onto the lower third of each tortilla.
4. Roll Tightly: Carefully roll the tortilla away from you, keeping the filling inside, and tuck in the sides as you go.
5. Secure Filling: For added security, you could use a toothpick to hold each taquito together if needed.
6. Heat Oil: In a large skillet, heat about 1-2 inches of cooking oil over medium heat.
7. Fry Taquitos: Once the oil is hot, carefully place the rolled taquitos seam-side down. Fry for about 3-4 minutes on each side, or until golden brown and crispy.
8. Drain Excess Oil: Once cooked, remove the taquitos from the oil and place them on a paper towel-lined plate to drain any excess oil.
9. Garnish: Sprinkle with fresh cilantro if desired.
10. Serve Warm: Plate the taquitos and serve immediately with your choice of salsa or guacamole.
By following these straightforward steps, you’ll have a batch of amazing taquitos ready to enjoy in no time!
Nutrition
- Serving Size: 6
- Calories: 300 kcal
- Fat: 12g
- Protein: 21g